Feeds:
Posts
Comments

Archive for the ‘Frugal’ Category

I bake.  A lot.  There have been times it has reached the “Whoa Nelly” level and I’ve submitted 34 separate items in the fair.   I can’t help it – it’s what I do and it makes me happy.   One of the side effects of baking with any kind of regularity is that there always seems to be dribs and drabs of ingredients left over.  You know, that half cup of walnuts or the quarter of a bag of coconut that didn’t find a home.  In my kitchen, all of these unused bits end up migrating into the freezer above my fridge, which is sort of the gulag of my food storage since things tend to accumulate unseen in its frosty depths for long periods of time.  Every now and then when the deposits start to reach critical mass, I’ll get annoyed and start pulling everything out vowing to do something with the mess.  And what do I do with the motley assortment?  Why, I make granola, of course.

I think granola is pure awesomeness because it is so versatile, and if you’re frugally minded, a great way to utilize all the little bits of things you have kicking around and make them into something new and tasty.  Or if you are a homesteady type, granola is a good way of using up all that fruit you dried last summer but never really figured out how to use.   Granola can be as healthy or as decadent as you want it because, other than a few basic base ingredients, the sky’s the limit and you can tailor it however you like.

I have to admit that I really don’t follow a recipe anymore because granola lends itself to experimentation so easily.  I just throw together whatever I have on hand, and the only time I’ve ever had a bad batch is when I forgot it was in the oven and it got a wee bit over done.  The recipe I started off using can be found here.  That recipe makes a pretty awesome batch of granola, and I even entered it in the fair and won a first.  But being as frugally minded as I am, I’m going to use whatever ingredients I have available instead of going out and buying stuff just to follow a recipe.

For my own granola, I use almost the same wet ingredients as the above recipe to make the goo.  The goo is what coats all of your dry ingredients and gives them sweetness and flavour.

1 1/2 teaspoons salt

1/2 cup brown sugar

1/2 cup maple syrup

1/2 cup honey

1 cup oil

1 teaspoon (or more) cinnamon

1 tablespoon or so (what I call a “glunk” – just eyeball it) of vanilla

I’ve used mostly maple syrup with a bit of honey, honey and corn syrup, corn and maple syrup – you name it – and it all turned out fine.  Just keep the volume of liquid the same.  Whatever you use, combine all of this together into a sauce pan and bring it to a boil over moderate heat until the sugar dissolves.  When it gets foamy you know its done.  This is then poured over your dry ingredients.

For dry ingredients I start with a base of 8 cups of oats and 2 cups of bran.  After that the choices are wide open to add whatever your heart desires until you have made up roughly another 5 cups of ingredients.  I say roughly because I never measure it, but you want to make sure you don’t add too much more or else you won’t have enough of the flavour goo to coat everything.  If you want to add any dried fruit or coconut you don’t need to include it into your 5 cup estimation because it needs to be added after the granola is baked and won’t get coated with the goo anyway.

Once you have all of your dry ingredients assembled, give them all a mix, pour the liquid over all of it and give the whole mess a good stir.  Doing this in your biggest bowl is a good idea, and if it’s metal all the better.  Remember that hot liquids and plastic are generally not a good combination.  Once it’s all combined, spread the granola out into your biggest cake pan, or several pans (it’s a lot of stuff!) and bake at 325F until it starts to turn golden.  I have found this can take as long as 30 minutes, depending on how deep the granola is in your pan(s).  You will need to give it a stir every now and then to make sure it gets all evenly toasty, and a good way to tell when it is done is to take a bit out and let it cool on a saucer.  If it is crispy, it is done.  Pull the granola out of the oven, and while it is still hot mix in your choice of dried fruit.  That’s it!  Once it has cooled completely store it in an airtight container and it should last you quite a long time.  Have fun playing with flavour combinations and experiment.  I am partial to lots of dried cranberries with almonds and a generous dose of vanilla myself, and I think one of these times I’m going to throw in some cocoa powder for a hint of chocolate.

Happy granola-ing, kids.

Read Full Post »

Make Your Own Yogurt

I tried to think of a catchy title for this post, and that’s what I came up with.   It’s been a long week.

Anyway, as you’ve probably guessed today’s post is all about making your own yogurt, right there in your comfy little home.  I swear yogurt has to be just about the easiest thing to make in the history of the universe, or at least the easiest thing I’ve experimented doing and had it turn out well.  I can’t believe I’ve been buying this stuff all these years.  There’s lots of  good information out there on yogurt making, and some of it is pretty fancy-schmancy and elaborate.  I’m sure that there are connoisseurs of the stuff who would stress the finer points of yogurt making, but I think fancy-schmancy and elaborate are kind of silly when all you really need to know can be boiled down into two simple steps:

1.  Add live, active yogurt-making bacteria to milk.

2.  Keep milk warm.

Really, it’s that simple.  How you go about doing those two steps is up to you and will depend on what equipment you have on hand and what will work for your situation.  Here’s what I did.

Step 1: Adding the Bacteria

To get a culture of active bacteria I simply bought some yogurt.  All of the directions I read said to use plain yogurt, so that’s what I bought.  I made sure to get some that said “active bacterial cultures” in the list of ingredients, but this may be moot since I don’t know how they would make it without them.  Anyway, that’s what I got.  For my very fancy culturing vessel I took a 1 litre canning jar and sterilized it with some boiling water.  I sterilized it because I didn’t want to inadvertently culture something nasty like cat fur-borne Ebola or something.  Into my freshly sterilized 1 litre jar I poured roughly 900 mL of warmed skim milk, then stirred in two generous spoonfuls of the purchased yogurt and gave it all a good stir and put the lid on.

Step 2:  Keeping it Warm

This is where I had to do some thinking.  Apparently yogurt bacteria love to do their thing at roughly 110F and need about 7 hours to do it.  I read lots of suggestions on how to accomplish this, ranging from using your oven to heating pads, but I wasn’t about to burn the fuel to heat my stove for that long just for some yogurt and my heating pad shuts itself off after about an hour or so.  And, well,  I can’t find it anyway.  I may be resourceful but organized I am not.  In the end I had to MacGyver my own super-fancy heating unit.

Pretty snazzy, eh?  That’s just a cheap styrofoam cooler inside of a cardboard box.  We get these at work all the time, and instead of throwing it away I snagged one for myself and brought it home.  To heat the inside I just filled another 1 litre canning jar with boiling water, popped it in and put the lid on the works.  I did this sometime in the early evening and let it sit until the next morning when I went to work, and when I opened the box it was still warm inside.  Then I just stuck the jar of yogurt in the fridge as I went out the door.  What could be easier than that? 🙂

Now, if you’re going to try this, keep in mind that homemade yogurt is a bit different from what you are used to getting from the store.  First of all, it’s not quite as thick as the commercial stuff.  That’s because it’s lacking all of the pectin, agar an other thickeners the commercial yogurt people add to it.  It’s also going to have a lot more of that watery stuff on top. Don’t worry, it’s ok.  The watery stuff is just a natural part of the culturing process and won’t hurt you at all.  I read that if you give the yogurt a good stir just before you put it in the fridge it will actually cut down on the watery stuff, since the bacteria don’t like to be jostled and will quit doing their magical yogurt-making things.  Or you could just pour it off like I do.  And remember that it is plain yogurt.  If you want to flavour it, stir in some jam, jelly or pureed fruit.    To keep the whole yogurt-making production going,  just start the whole process over again using a couple of spoonfuls of your homemade yogurt instead of buying some more.

Pictured above is a tasty little treat I made for myself using the yogurt, homemade granola and raspberry jam from our own berries.  I don’t actually know how it tasted because when I came back from putting the camera away Ginger, the tortie cat, had her face happily stuck in the bowl.*  I love my cats, but I don’t want to eat their slobber.  Looks good, though, doesn’t it?

Happy yogurting, kids.

* Ginger said it was delicious.

Read Full Post »

Biscuity Scone Things

Lately I have been thinking a lot about how baking is an important and valuable self-sufficiency skill, and how it is often overlooked as being a skill at all.  I’ve been thinking about it so much, in fact, that I haven’t had the time to write anything about it.  What can I say?  I chalk it up to being too busy actually doing the things I want to blog about to, you know, blog about them.  In the meantime, I figured I would toss one of my new favourite recipes out there and give y’all something to do while I ruminate over my deep, deep thoughts on how muffins might potentially save the world.

A short time ago I was perusing an online forum of depression-era recipes looking for some new ideas on how to use all-purpose flour to make bread or bread substitutes, simply because I can buy 10 kg of all-purpose flour for the price of 2.5 kg of bread flour.  I’ve never been able to produce a decent loaf of bread using all-purpose flour, even with my mad skills. (I may have, ahem, won a provincial bread championship..but that’s a story for another day :)). At close to $7 a bag, bread flour almost makes it not worth it to make bread.  Still cheaper than buying it from the store mind you, but this is supposed to be a staple, the staff of life.  I don’t know enough about wheat markets to understand why bread flour is so much more expensive, but I’m inclined to think that there is some shadowy underworld cartel in Saskatchewan controlling the supply of all the bread flour in Canada and that they drive the price up so they can all retire in Costa Rica, smoke cigars and live in beach front villas with little dogs named Pepe.  But I could be wrong on that.  Still, I like being able to bake really awesome stuff with inexpensive ingredients even if it’s not sticking it to Gordie the Underboss in Moose Jaw.  That’s just how I roll.

So while perusing said forum, I came across a recipe for what was described as a basic scone.  Scones are one of those things that have somehow become elite, even though at their origins they were basically peasant food.  Just pop into your local high-end coffee shop (any one that starts with an S and ends with a Bucks…you get the picture) and check out what they are going for.  Pretty laughable.  Anyway, this recipe is the simplest I’ve ever come across and after whipping a batch up I am pretty much in love.  I decided to call them Biscuity Scone Things because they are more like a tea biscuit than a scone, since they use shortening instead of butter (technically scones are made with butter), but who really cares what they are.  They are super easy, cost pennies to make and, most importantly, were Freekin Delicious.  Here’s the original recipe as I wrote it down (shout out to the person who posted this originally on the forum I can no longer find, I would credit you if I could).  I personally doubled this when I made it because I double everything I make, and because in its original form will only give you about 4 or 5 decent sized biscuity scones.

Biscuity Scone Things

2 1/2 cups all-purpose flour

2 teaspoons baking powder

2 tablespoons sugar

1/2 teaspoon salt

6 tablespoons shortening

3/4 cup milk

Optional: 1/2 cup raisins. *If omitting the raisins, as I did, add another 2 tablespoons of milk

Directions:

1.  Mix the flour, baking powder, salt and sugar in a bowl.  The original recipe called for all sorts of sifting here, but I think sifting is a load of poo.  I have boxes of ribbons from the fair and I never sift anything.  Call me a rebel.

2. Measure out your shortening and cut it into your flour mixture until it is very fine.  Just another tip: a tablespoon of shortening is roughly the size of a thick pat of butter.  If you can picture that just lop off a hunk and throw it in.  If it’s not exactly right it won’t make much of a difference.  If you have one, use your pastry blender to cut the shortening in.  It’s kinda what they were invented for.  If you don’t have one just use a couple of knives and pretend you’re Wolverine.  Just get the shortening minced up into little pieces.

3.  Add the raisins if you are using them and give it all a mix.  Then pour in your milk.  Mix it all up JUST UNTIL MOISTENED.  Didn’t mean to yell there, but that’s important.  If you mix the snot of out it you’ll end up with hockey pucks, not delicious treats.

4.  Turn the dough out onto your lightly floured counter and divide it into 2 pieces.  Gently pat each piece out into a circle roughly an inch and a half or so thick.  These don’t puff up much while baking, so if you want them thicker then by all means make them thicker.  There’s no rules here.

5. Cut the rounds of dough into wedges.  You could cut them into circles if you like, but wedges require less work and there are no scraps to gather up and smoosh together.  Remember, the less you handle this stuff the better they will be.

6.  Bake on a cookie sheet for around 15 minutes in a 375F oven.  I say around 15 minutes because I think that giving precise times in recipes is also a load of poo.  No one’s ovens are the same, so it’s better just to watch things and learn when they are done.  These are done when they start to turn a bit golden all over.

When they are cool enough to handle, slice one open, slather it with butter and eat it right there standing in your kitchen.  One of life’s small pleasures is eating something still warm from the oven, and is impossible to duplicate with something from the store.  Kept in an airtight container, these will last all week.

Happy baking, kids.

Read Full Post »

I’m So Cheap…

…I think I’m going to plant kidney beans from the grocery store this year.

Last year was the first we had ever tried to grow any kind of shell bean (meaning the kind of bean that you leave on the plant until dry, then shell out the bean seeds to eat), and the kidney beans we grew did fabulous.  I was so impressed with how they did that  kidney beans have likely earned a permanent spot in the garden lineup.  I developed such a crush on them that I am, in fact, looking to expand our shell bean-ing endeavours to the multitude of beans out there.  What’s not to love?  They practically grew themselves, produced a ton of beans in a very small space and the only processing they needed involved cracking open the dry shells while sitting in front of the tv watching creepy movies.  Add on top of that the fact that they require no fossil fuels to store (just stick ’em in your cupboard), are an easy source of protein and actually benefit the soil they grow in and you’ve got yourself a match made in heaven.  Besides, anything that lets me  watch more creepy movies is a winner in my book.

So, recently I decided to get out my seed stash and take inventory of what I had squirreled away and found that, because of my hoarding  my careful seed saving and stocking up during sales, I actually don’t have to place a seed order this year.  Only one problem…no kidney beans.  We had an, um,  incident with last year’s beans.  Just a word of advice:  if you have  cat that is shall we say “creative” with her potty habits, don’t think she won’t find the beans you thought needed a bit more drying time and put in your best slab cake pan to dry.  Just trust me on this one.

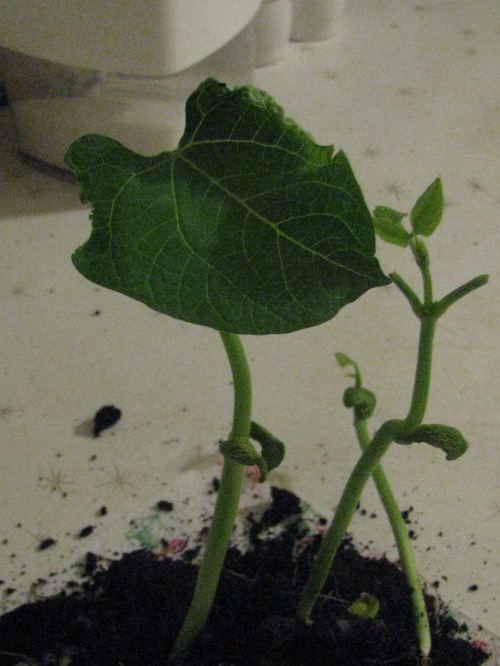
Anyway, so here I am faced with a dilemma.  Do I go through the bother of placing a seed order and pay the shipping and handling for just one item, or do I just skip my beloved beans for a year?  In the end I decided to try a little experiment and picked up a bag of kidney beans from the grocery store I pass by twice a day, stuck them in some dirt and waited to see what happened.  And you know what?

They grew! (Sorry for the poor picture quality.  Taking a picture was sort of an afterthought after I had already ripped the beans out of the dirt so I could use the pot to start some leek seeds.  Photographer, I am not.)

I have no idea what variety of kidney beans these are, where they come from or if they will even grow under my conditions or produce edible beans in my growing season, but I’m going to try. I imagine that they are probably hybrids (is there even such a thing as a hybrid kidney bean?  I don’t know) since they were almost certainly grown by a commercial farmer, and so will not likely retain the same vigour as their parent plants, but who cares?   I’m not trying to maximize my yields, just grow some food for my family.    I may end up with nothing.  I may end up with weird Monsanto frankenbeans.  Heck, I may end up with triffids for all I know.  I just think this is a useful experiment in finding a way to grow food for my family with little output of resources.  If this works, I will know I can go to the grocery store and get a kilogram of beans off the shelf for two dollars and hopefully turn that into a year’s supply.  Might be useful knowledge in hard times.

I’ll keep you posted as the season goes, kids.  And keep your fingers crossed for me that they’re not triffids.  I really hate running.

Read Full Post »

I’ll admit I am a little enthusiastic about vegetable gardens. Get me talking about them and I’m liable to start off fine, maybe discussing what type of tomato to grow, but inevitably I’m going to start bantering things like “sustainability” and “local food sheds” around and you’ll start looking for something sharp to poke me with.  I won’t subject you to any of that (or the ever-popular Peak Oil Rant), but instead share with you a little project I’ve been working on that deals with something near and dear to most peoples’ hearts – money.  

 The nitty-gritty of it is that a vegetable garden is the first logical step and, in my opinion, the easiest thing a person or family can do in becoming more self-reliant.  And since self-sufficiency and frugality tend to go hand in hand, a vegetable garden will not only provide you with food to eat but will do so inexpensively.  It’s a no-brainer, kids.  If you grow it you don’t have to buy it, which means more money for fun things like hydro bills, taxes and deworming medicine for the dog.   For gardening veterans this is elementary, but I am constantly surprised at the amount of people I know who are convinced that they have neither the time nor the resources to have even a small garden.  This is my attempt to woo some of these people over to the dirty side of the Force by presenting, as objectively as possible, the monetary value of having a vegetable garden.

Some time ago I came across an article on a website where a guy tallied what he grew in his garden and then calculated what it would be worth if he had to purchase it all.  I thought “What a splendid idea!!” (yes, I actually used the word splendid), and set about keeping track of everything that went in and out of the garden and generally annoying the crap out of everyone around me.  Did I mention that I weighed everything?  Yeah, I was that annoying.  So without further ado, here’s the Big Bad Tally:

 Total Expenses: $237.71

This includes everything from potting soil to start seedlings to gas for the rototiller.  I also took half of the cost of my seed order from 2009 and half from 2010 since I never use all of the seeds in one year.  This also includes the cost of some seedlings I had to purchase because a certain tabby cat who shall not be named thought pepper plants were a tasty treat.  What this doesn’t include is all of our corn seed (given to us from a seed dealer Dad knows), and about half of the seed potatoes and onion sets we used which were destined for the garbage bin and were gifted to us. But that’s what happens when you garden – people think of you.

 Total Value of Food Produced: $3,168.12

To calculate this I just recorded the price of things when I did my grocery shopping.  Sometimes I forgot, so this number reflects a combination of both in season and out of season prices.  I can justify this as I preserve what I grow and rarely, if ever, buy anything I grow from the grocery store.  Also, there were times I got really lazy in the summer and wrote down things like “green/yellow/red pepper”.  The prices of these vary greatly, so in instances like this I either used the lesser price or took one somewhere in between.  This is also a combination of sale and regular prices, since that is the way a regular person does their grocery shopping. I didn’t use any organic prices even though they would actually reflect what came out of my garden since someone on a budget won’t be buying organic anyway.  I was aiming for a general idea of the value of what we grew, not an uber-accurate number.  I’m not that crazy.

 Net Value: $2,930.41

So to get really nerdy on ya, I had a twelve-fold increase on my initial investment.  To put this into perspective, consider that according to Stats Canada the average 2.5 person household in Ontario in 2007 spent roughly $7,383 on food.  We don’t come close to that (I also saved all of my grocery receipts from last year – I am that crazy) even though we are actually a 2.5 person household.  And, no, Dad didn’t half himself in a tragic machete accident,  I just don’t feed him 100% of the time.  There are a number of reasons why we don’t spend that much, but the garden certainly helps.  And in actuality we could do a lot better and eat a larger portion of the vegetables we grew every day (and we probably should) and further cut the bill.  I literally have a freezer full of veg from the garden right now and if we had to, could probably last until June with that and what is stored in the basement.  Not that it would be much fun, but people have done worse in hard times.  I just wanted to point out that close to $3,000 worth of produce is a lot of food.  Roughly 1,692 lbs of food actually (I didn’t weigh the corn or pumpkins..who would?).  And no, I didn’t preserve all of that.  I plant such large amount every year with the intention of giving to the food bank which I do as much as possible, and I share with family and friends.

And now for some of the details I know you’re wondering about:

  1. The garden is roughly 4,000 square feet.  I say roughly because I very un-scientifically paced it out last year with snow on the ground, and one half of it is irregularly shaped.  It is probably less than that, I really don’t know.  About half of that was nothing but corn and pumpkins.  This probably represents a great deal of wasted space, as there are a lot of people out there producing just as much or more on smaller parcels of land, but I have no need to plant more intensively or produce any more than I do.
  2. I probably watered it two or three times last year, and only portions of it.  We have heavy clay soil and generally have problems with moisture retention if anything.  I water when I first transplant seedlings and that’s about it.  I mulch with grass clippings which helps too.
  3. I spent a little time in the garden most days, maybe on average an hour a day.  Sometimes more, sometimes I wouldn’t even look at it for days at a time.  The key is to stay on top of it and the work doesn’t pile up.  And there absolutely were times when it felt like a part-time job, but that had more to do with the preserving end of it than the actual gardening part.  When you average it out over the course of a year, or even a summer, it’s really not that much.  It’s what I do instead of watching tv. 
  4. There are a fleeting few weeks a year when it looks like the pictures of vegetable gardens you see in magazines.  The rest of the time it’s a bit of a jungle.  The point is to grow food, not look pretty.  I don’t waste my time and effort with what’s not necessary.
  5. I start all of my own seedlings.  I have big widows and I am cheap.  Buying seedlings would increase the initial cost.
  6. I do have help.  The men-folk in the tribe help with the tilling, some planting and the digging.  And my brother and I learned how to pickle just about anything.

 So there you have it, for what it’s worth.  I just thought it would be interesting to look at the humble vegetable garden from a different angle and possibly encourage more people to think about starting one.  Growing a garden to buffer your self against hard times is nothing new – during WWI and II they called them Victory Gardens, and I’ll admit freely I am a bit of a doomer and think people need to learn the skills to take care of themselves.  But the doomish crazy-talk aside, I love my garden.  I love the peacefulness of being outside on a summer’s evening.  I love that it is back yard stress therapy.  I love that it feeds us, with no worries of chemicals or weird poop bugs from far away places.  I love that we did it ourselves.  And if zombies ever do attack, well, at least there’ll be pickles.

Read Full Post »

« Newer Posts